Need a knowledge base like this for your business?
Setting Up The CRM Module
By Kim Dixon, MyPhotoApp Training Guru
Created: April 8, 2018, 8:02 pm UTC Last updated: July 10, 2020, 6:56 pm UTC
Setting Up The CRM Module
The CRM - Client Relationship Management - module is available for ELITE members only. It allows you to add client contact details together with any additional notes you want to include for that client to a Virtual Rolodex together with tags to help you organize and filter clients. You can search across all fields to find relevant client entries by the keyword tags you have chosen to use. The CRM module is Brand specific, what you enter in one Brand does not appear in any other brands. If you wish to set up CRM in multiple brands you will have to repeat these instructions. You can use the same email service credentials for multiple brands BUT you will need a unique dedicatedTwilio phone number for MyPhotoApp per brand to enable the SMS messaging.
Once you have added a client you can then manually set up appointments for them and appointment notifications will then automatically be sent by email and or text. There is no default MyPhotoApp email or text service for sending CRM appointment notifications and in order to take full advantage of the CRM features and enable communication with the client, you will need to have a supported email service provider and/or a text service provider to link to the CRM module. If you link both, recommended, clients will automatically be sent both text and email notifications for their appointments.
Add Your Company Info
When you first click on the CRM tab in the builder the CRM configurations menu will automatically open.
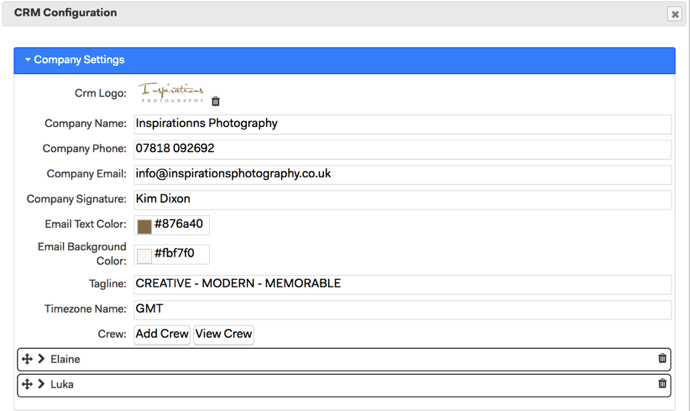
The Company Settings menu is the first one you will see. The information you enter here will be used to brand the client email and/or text notification messages.
CRM Logo: Upload the company logo you wish to use for the CRM notifications; this should be in png, jpg or gif file format.
Company Name: Enter the company name, as you want it to appear in the email Footer information of notifications.
Company Phone: Enter the company phone number; this should initially be a mobile phone number if you intend to use the text messaging capabilities. The phone number is included in the footer information of notifications.
Company Email: Add the email address you wish to be included in notifications and to which your copies of notification will be sent.
Company Signature: Add your name as you want it to appear in notifications.
Email Text color: set the color for email text by adding the hexadecimal color to match your brand or by using the color picker
Email Background color: Set the email background color. Remember to make sure it will work with the logo file you have uploaded.
Tagline: Add a tagline for your brand, this will appear in the center of the email footer information.
Timezone: Add the correct abbreviation for your time zone.
Crew: click the Add Crew button to add members of your team such as your assistant or HMU artist to easily include them in appointment notifications. Enter their name, email and mobile phone number.
If you have added more than one crew member you can tick the box to choose a default crew member for notifications and rearrange crew details using the 4-way move arrow in the top left corner. You can delete a crew member by clicking the trashcan in the top right corner.
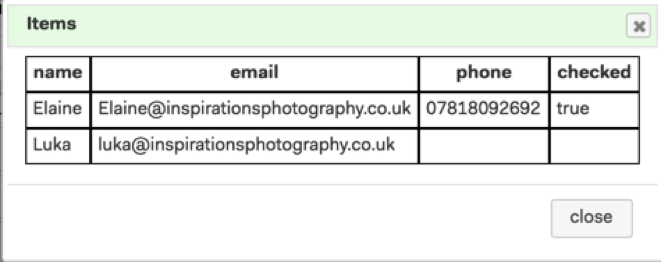
Clicking the View Crew Button to see a table listing your crew members If true is shown in the checked column this means the default tickbox is checked for that crew member.
You can update or change information at any time by clicking on the Settings Cog to open the CRM configuration, to return to the Company Settings menu where you can then make any changes your wish and Save them to update the information that will be used in future.
If you have finished entering information, for now, click Save to exit the CRM configuration and save the information. Clicking the ‘X’ to close will exit without saving the changes.
If you already have your email and text services set up click on the Credential Settings to continue.
Setting Up an Email & Text Provider
In order to send appointment notifications, you will need to set up an email and or a text provider in the CRM Credentials menu. MyPhotoApp currently supports the following services:
Mailgun - Email service free for up to 10,000 emails a month
Postmark - Email service free trial then $10 for 10,000 emails a month
Twilio - SMS service free trial then PAYG you pay $1 a month for your telephone number and a nominal charge per text.
If you don't already have any of these accounts you will need to sign up for them by clicking the links above and then return here to follow the rest of the setup instruction.
Setting up the email services to obtain the necessary credentials to enter in the CRM module can be a little challenging if you are not familiar with managing your domain DNS and record settings, but usually the support provided by your domain provider and both services are pretty good and once you have done it you won't need to do it again! But set aside a couple of hours to get it all worked out.
The Twilio set up is much more straightforward and once you have signed up you will be walked through the initial steps to get your first phone number.
Click here to find out more about how to sign up for these services and set them up ready to work with MyPhotoApp:
NOTE: Before you can add your Twilio account credentials to the CRM configuration you must first set up a webhook for your Twilio Phone number to point the Messaging service to the MyPhotoApp server. Because of this requirement the phone number will need to be a unique dedicated phone number that is used only for MyPhotoApp. To find out how to do this click the link to the Knowledge Base Article on Twilio above.
Adding The Credential Settings
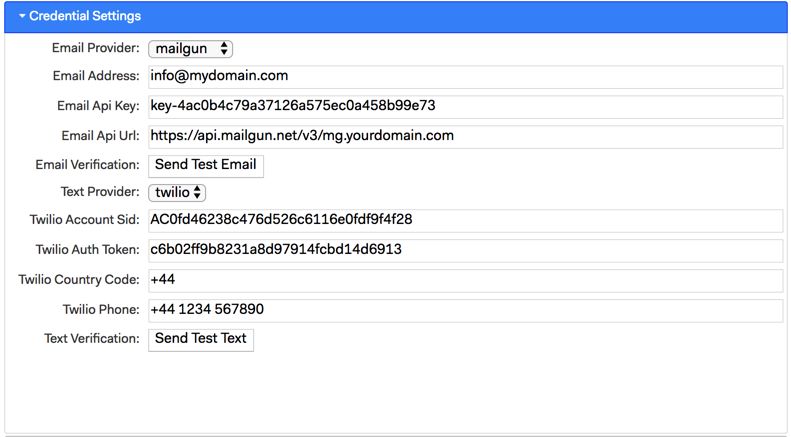
Once you have signed up for your chosen service providers and set them up to work with MyPhotoApp you are ready to add them to the CRM module. Click on the Settings Cog and then on Credential Settings to add the necessary information to link the services to MyPhotoApp. By default, the email and text providers are both set to none.
Email provider: To add an email provider choose the one you wish to add from the drop-down menu.
Email address: Enter the email address you have linked to the email service you are using.
Email API Key: Log in to your chosen email service and locate and copy the Email API Key and paste it here.
Email API URL: ONLY required for Mailgun Email set up and won't show if you choose Postmark as your email provider. Log in to your Mailgun account and you will find this on the Dashboard under your domain listed as API Base URL.
Email Verification: After you have clicked SAVE to update the CRM settings you can return and click the Send Test Email Button to test your email account settings.
Text Provider: If you are adding a Twilio account choose this from the drop-down menu.
Twilio Account Sid: Log in to your Twilio Account and locate the API credentials copy the LIVE credentials Account Sid and paste it here.
Twilio Auth Token: Copy the Live credentials Auth Token and paste it here
Twilio Country Code: Type in the Country Code for your Twilio Phone number, including the + symbol.
Twilio Phone: Enter the full Twilio phone number including the country code.
Text Verification: After you have clicked SAVE to update the CRM settings you can return and click the Send Test Text button to test your Twilio SMS account settings.
When you have finished entering the email and or Twilio account details click Save to update the CRM settings.
Before moving on it’s a good idea to try some test notifications to your self to confirm both services are working correctly. Click the Settings Cog and Credential Settings again and click the Email and Text Verification Buttons to test the accounts.
Now you have added the email and or text credentials appointment notifications will automatically be sent out by whichever methods are actively selected in the provider drop-down menu.
Tip: If you want to turn off either email or text notifications simply select none from the provider drop-down menu and click save to update the CRM settings and that particular service will be temporarily turned off. The credentials you entered will all be saved and you can turn it back on again by selecting the correct service provider from the drop-down list and clicking save to update the CRM settings.
CAUTION: If you turn off both email and text no client notifications will be sent for any appointments!
Adding Clients To The Rolodex
To get started it’s a good idea to set up a few ‘test clients’ with one of your own email addresses and your mobile number. This will allow you to familiarize yourself with the CRM features and test your email and text service provider credentials are working before you start trying to add real clients and live appointments.
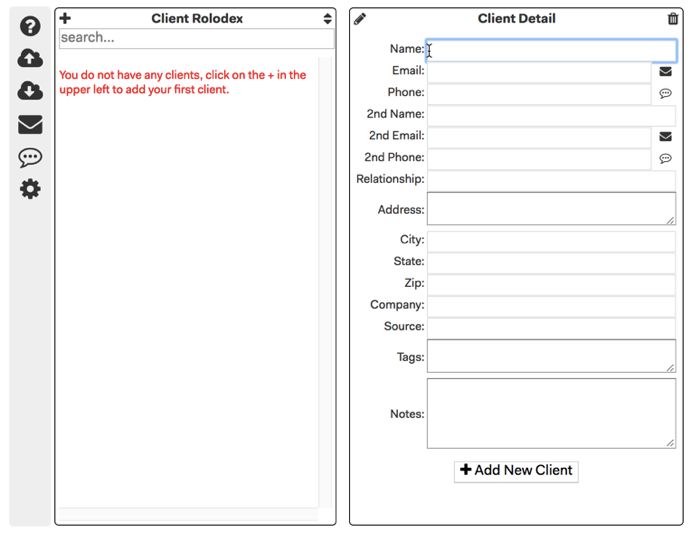
To add your first client click the + plus symbol to the left of the Client Rolodex heading and the Name field will be highlighted ready for you to start typing. You can move to the next field to enter information by pressing the Tab key on your keyboard.
Name, Email & Phone: The first 3 fields are for you to enter the contact details of your client.
2ndName, 2ndEmail & 2ndPhone: These are optional and can be used to add the contact details of anyone else who should be included in the appointment notifications. This is handy if you are adding the details of a high school senior as you can add both the parent and the senior's contact info ensuring everyone gets the appointment notifications. Or perhaps you have a client who is having a shoot with their sister or best friend and you need to notify both of them.
Relationship: Below the 2nd set of contact fields is where you can add the relationship of the second contact to the main client, for example, daughter, mum, sister or friend.
Address,City, State & Zip: These are where you enter the address details of your main client.
Company: Enter the details of the company name if this is a commercial client.
Source: Enter any source for how the client came to book, for example, FB Ad, Referral, Repeat Client, Website etc.
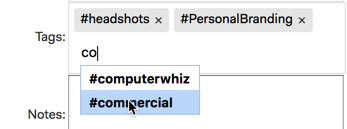
Tags: You can add individual keyword tagsprefixed by the # symbol that apply to this client. You must press the Return/Enter key after each tag to apply it and separate each new tag you add with a space. As you begin typing you will get a list of auto suggestions for similar tags with the same starting letters that you have already used, to choose a tag from the list just click on it.
If you have already used a particular Tag you do not need to type the # symbol and can quickly add the tag by typing the first 2 letters and it will appear in the auto-suggestion list ready for you to choose. Tags are not case sensitive but must always be single words, so if you want to add Personal branding as a tag you need to add it as one-word #PersonalBranding and not #Personal Branding. You can easily delete a tag if you have made a mistake or it's no longer relevant using the 'X'. once a misspelled tag is no longer in use it will cease to appear on the autosuggestion list.
Notes: Add any notes, special requirements or instruction, for example, significant others details, siblings names and ages, allergies, special requests or dates to be avoided or deadlines to be met.
When you have finished entering all the client information you want to click the + Add New Client Button to save the Client Record to the Rolodex.
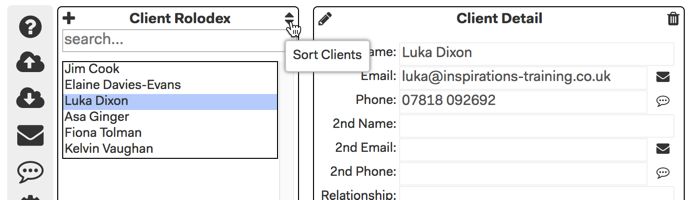
To update a client record simply select the client you wish to make changes to in the Client Rolodex and click the Pencil symbol to edit the record. When you have finished click Save Client Information button to update the record.
You can sort the Client Rolodex alphabetically buy either First or Last name by clicking the Sort Clients arrows. The default is to sort by the client's First name.
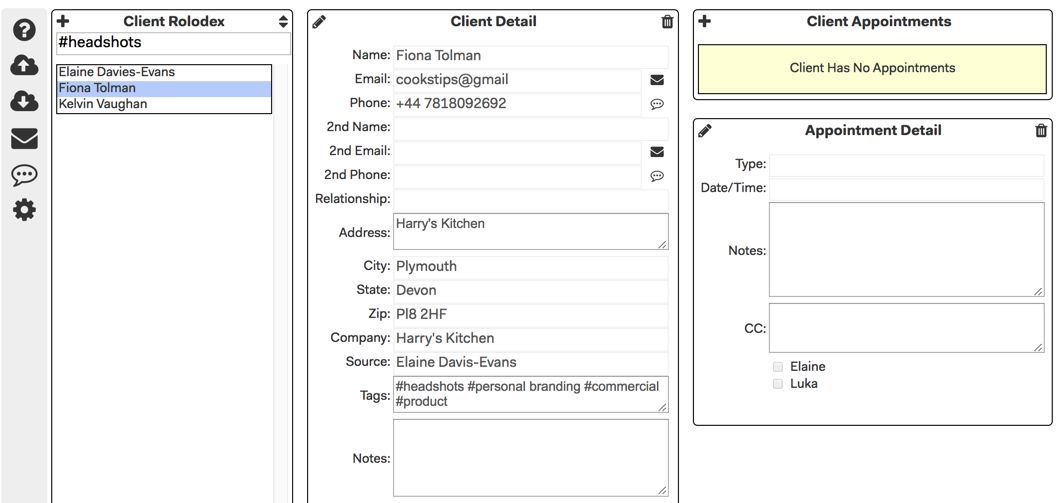
Searching Your Client Database
Once you have added a number of clients you can easily filter your client records using the Tags you have added to the individual client records. For example, #portrait #sport #senior #commercial #headshots #newletter #specialoffers. It's a good idea to create a list of the Tags you intend to use to help you stay consistent and well organized. Enter the tag or tags you want to filter by in the Client Rolodex Search Box to automatically display all the client records in your Rolodex with that particular tag or combination of tags.
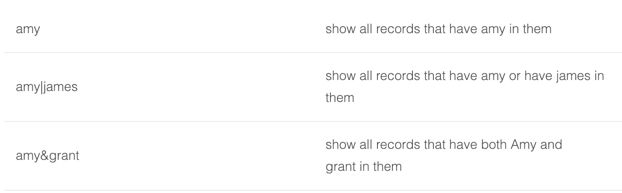
As well as searching by tags the Rolodex search has the ability to search across all fields in the client records for particular words using regular expressions which allow you to perform and/or type searches.
Here are some examples:
Use of '&' for a search term is not part of the regular expression syntax but a MyPhotoApp addition that can be used in the Rolodex search. Search words are not case sensitive so a search for 'amy' will match any variation of it: AMY, Amy, AmY or amy.
Here is a reference to regular expressions if you'd like to learn more: Regular Expression
Adding Appointments For Your Clients
The client appointments option allows you to manually record appointments for your clients so that appointment notifications can automatically be sent by email and or text where the appropriate credentials have been set up and are active.
NOTE:Notification messages are sent to the client, 2nd contact and any Crew or any other email address added in CC field when the appointment is made. All these emails addresses will, therefore, be shared with anyone who is notified. This can be handy if your client wants to send a special request to the hairdresser.
To add a new Appointment
1. Select the client you wish to add the appoint for from the Client Rolodex.
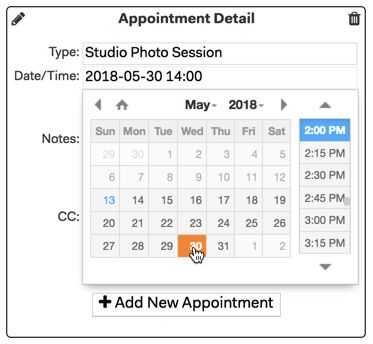
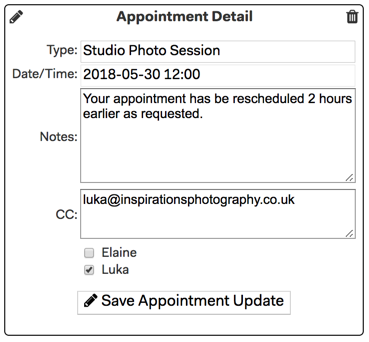
2. Click the pencil in the Appointment Detail area to activate the fields.
3. Enter the details of the Appointment Type.
4. Choose the date and time from the drop-down calendar.
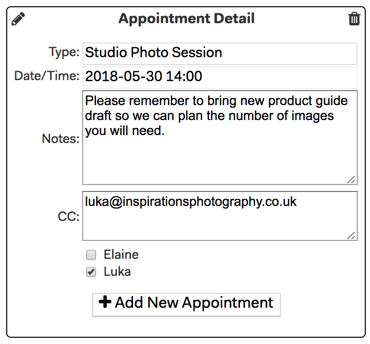
5. Add any notes – These can either be included in the client emails or not depending on how you have set up the new appointment email in the settings menu. This can be a useful way of customizing the default message you are using with specific details.
6. Add the email address for anyone else you also wish to notify in the CC field.
7. Tick the box to include any crew members you have set up, such as your assistant or HMU artist. Their email will automatically be added to the CC field. Unticking the box will remove their email.
8. Check the appointment details for any errors, once the appointment is confirmed
9. Click the add new appointment button to confirm the appointment.
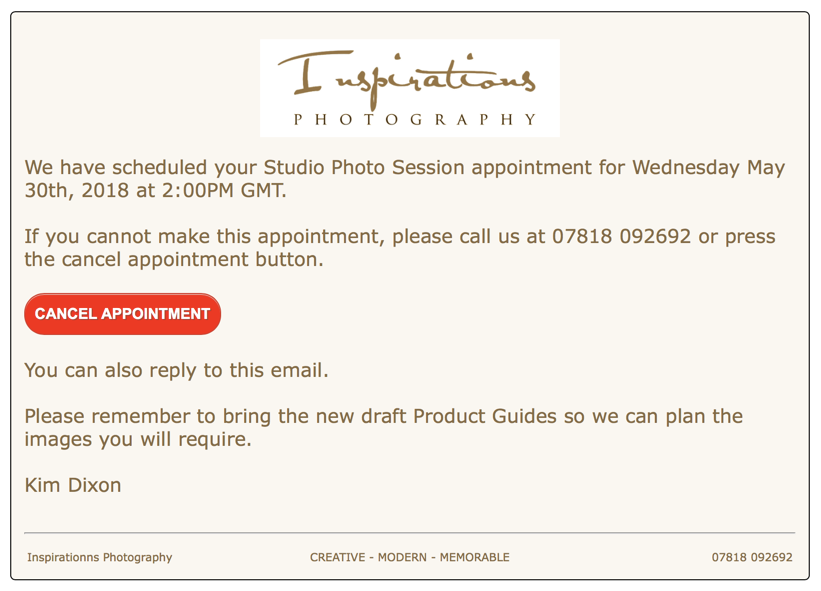
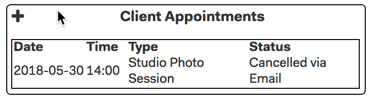
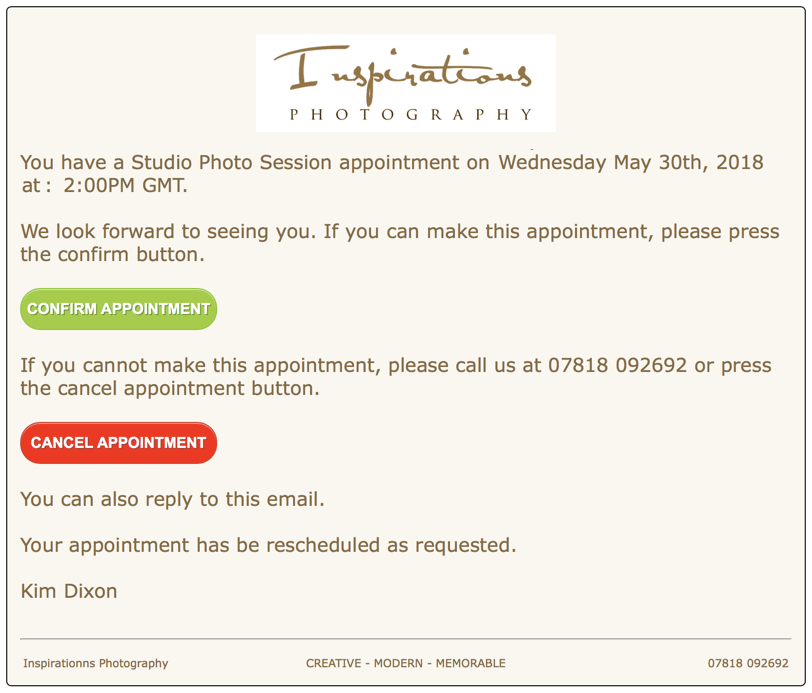
The appointment will now show in the client appointment area. The client, any 2nd contact and anyone else whose email you have included will automatically be sent an email and or text based on the messages configured in the New Appointment Settings notifying them of the appointment details. The studio will also receive an email copy to the studio email address added in the CRMCompany Settings.
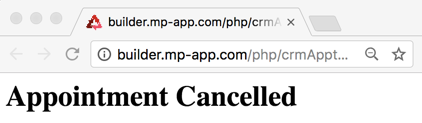
When the client clicks the cancel button, if included in your message, a confirmation message of the cancellation will be displayed in their web browser.
In the client appointment area the appointment will be marked as cancelled together with how the cancellation was received.
A cancelation message with the following information will be emailed or texted to the studio:
"Fiona Tolman Cancelled their appointment which is scheduled for Wednesday, May 30th, 2018 at 2:00PM GMT."
When a client responds to an email notification to accept or cancel an appointment it will be emailed to the studio email address recorded in the CRM company settings.
To Check or Update An Appointment
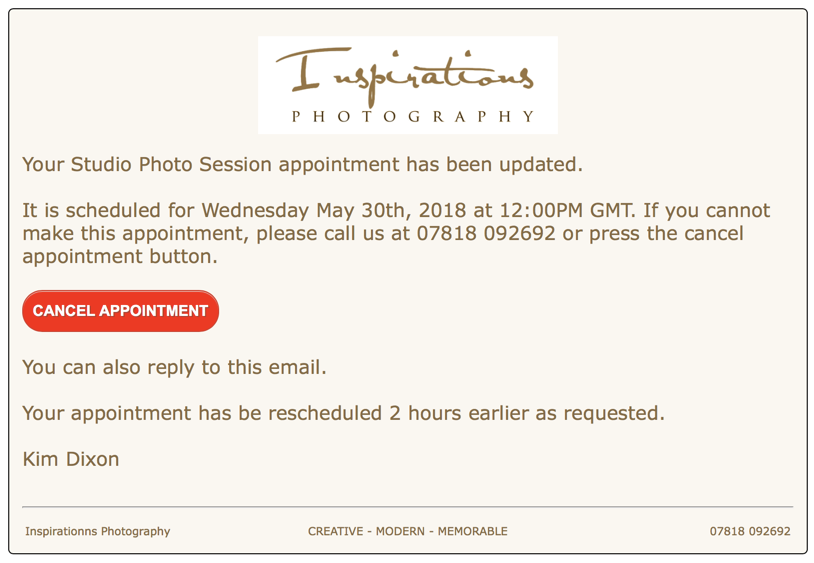
To view an appointment for a client simply click on the appointment in the client appointments area. To update the appointment details with any changes click the pencil to enable you to edit the appointment. When you have finished editing the appointment click the update appointment button.
The client, and anyone else you have included will automatically be sent an email and or text based on the messages in the Update Appointment Settings notifying them of the changes made to their appointment. The studio will also receive an email copy.
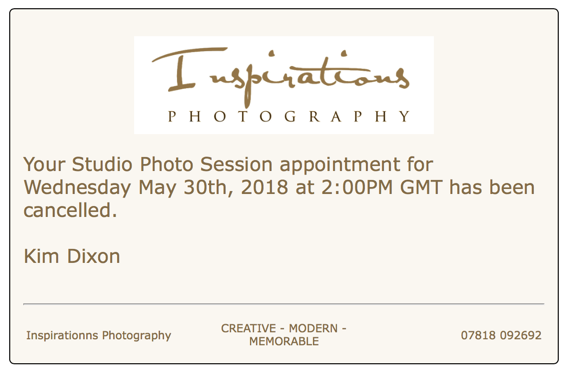
To Cancel An Appointment
If you need to cancel an appointment click on the appointment in the client appointment area and then click on the trash can to delete the appointment and thereby cancel it.
You will get a confirmation message that the appointment has been canceled and the client, and anyone else you have included will automatically be sent an email and or text based on the messages in the Cancel Appointment Settings notifying them that their appointment has been canceled. The studio will also receive an email copy.
Appointment Reminders
Automatic appointment reminders based on the message in the Reminder Appointment Settings are emailed and or texted to the client 24 hours prior the appointment. The studio will also receive an email reminder.
Customizing Appointment Notifications
Now you are ready to customize your appointment notification messages so they reflect your style of communication and include the information you want. However, you cannot change when these messages are sent as MyPhotoApp automatically sets that.
You can customize the text for each of the 4 types of appointment messages on the relevant setting tab in the CRM configuration menu:
New Appointment
Update Appointment
Cancel Appointment
Reminder Appointment
Each of these has a default email and text message, which will automatically be sent to your clients and any other people included if you do not make any changes.
Tip: If you want to return to any of the default MyPhotoAppnotificationmessages click the link below to view the Knowledge Base article with the default notification messages for you to copy & paste.
When you customize notification messages you can include email and textfields that automatically substitute the relevant information from the CRM Company, Client and Appointment details.
The following Fields can be used in the email and text notification messages and the relevant information will be inserted. The fields must be entered exactly as shown with the brackets in order to work.
In addition, the following fields can be used in the text notification messages to generate a Cancel or Confirm code for people to respond with.
{cancel code}
{confirm code}
The codes will look like this:
CANCELxx
CONFIRMxx
Where xx is a unique number (based on the hidden system appointment number 1, 2, 3, etc assigned by MyPhotoApp). The xx will grow over time as you add more appointments for example when you have created 300 appointments, the code would be CONFIRM300.
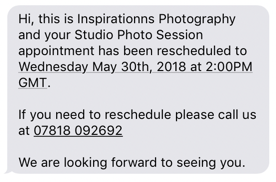
Text notifications messages are shorter and do not include any automatic footer information. If you wish to include a cancel code or remind them how to get in touch you will need to add this to the message its self in the relevant Appointment Settings.
Here is an example of an Appointment Update text message where I have added the sentence about phoning to reschedule.
Email notification messages use the logo, background and text color you set in the Company Information Tab of the CRM Customization settings. It will also include the Company name, tagline and phone number as the footer information for each message. There is currently no option to customize the font used in email messages.
To update the CRM Settings with your customized messages remember to click SAVE.
Text Auto Responder
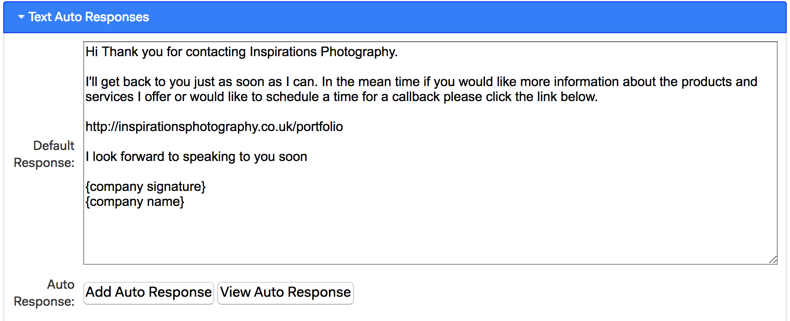
MyphotoApp has a basic Text Messaging option, that can be found on the Setup Tab. This provides a single text Auto response whereby when people text your MyPhotoApp Brand ID to the following MyPhotoApp phone number (502) 547-1234 they will receive the message you have set. The AutoResponse message is sent from the same MyPhotoApp phone number.
With the new CRM module, you can create unlimited Auto Responses to your own Twilio phone number when the keyword you set is texted to it.
It is important to make sure that your Twilio phone number is correctly configured and set up before you try to use this feature.
If you have added a Default Response this will be sent when the keyword is not recognized. When NO Default message has been entered unrecognized messages will automatically be forwarded to your company phone number as entered in the CRM Settings for you to manually deal with.
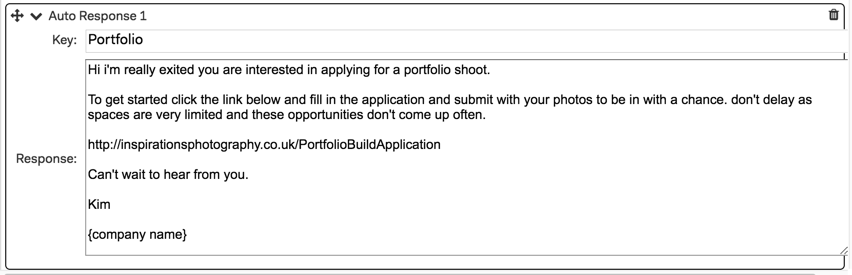
Add A New Auto Response
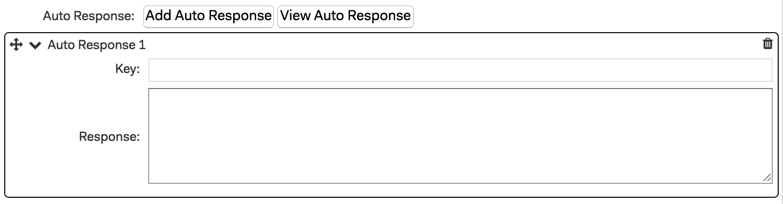
To set a new Auto Response click the Add Auto Response Button and a New Auto Response message record will be opened.
Key: Add a single keyword you want people to text to your Twilio Phone Number.
Response: Type in your response, you can also use the relevant Company message fields if you want to automatically fill in company details etc, but obviously you shouldn't include any of clients or appointment related fields as these would not be relevant.
To add another Auto Response message click the Add Auto Response button again. By default Auto Response messages are listed in the order you add them and numbered consecutively Auto response 1, Autoresponse 2, etc.. You can reorder the Auto Responses you have added by clicking on the 4-way arrow in the top left-hand corner of the Auto response record and dragging it up or down the list to the position you want.
To Save your changes click SAVE and next time you open the CRM settings the Auto Responses will be in the new order you set and renumbered correspondingly. If you exit the CRM settings without clicking SAVE they will revert to the original default order.
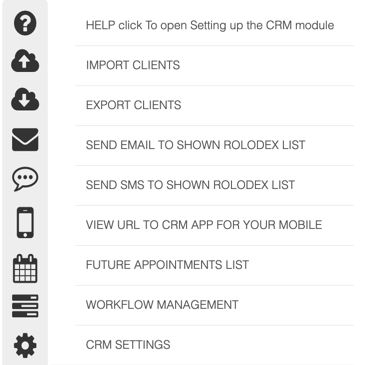
The CRM Side Menu
This is where you can access the CRM tools:
You can send a group email or sms to shown client rolodex list, where you have not applied a filter this would be the entire client list.