 |
Need a knowledge base like this for your business?
How To Get Started With MyPhotoApp
| By Kim Dixon, MyPhotoApp Training Guru Created: December 5, 2015, 6:38 pm UTC Last updated: February 9, 2019, 10:24 pm UTC |
Building Your First App
Welcome To MyPhotoApp - The Mobile Marketing Machine
MyPhotoApp's unique set of capabilities is everything you need to build gorgeous apps across all devices the easy way. There is nothing else quite like it! No matter what business you are in MyPhotoApp allows you to build attractive mobile apps on your computer that will engage your clients and spread your brand through your client's social network.
In this How To Guide, I'm going to show you everything you need to know to easily build your first App in a matter of minutes.
The Wizard - Create Quick & Easy Photo Apps
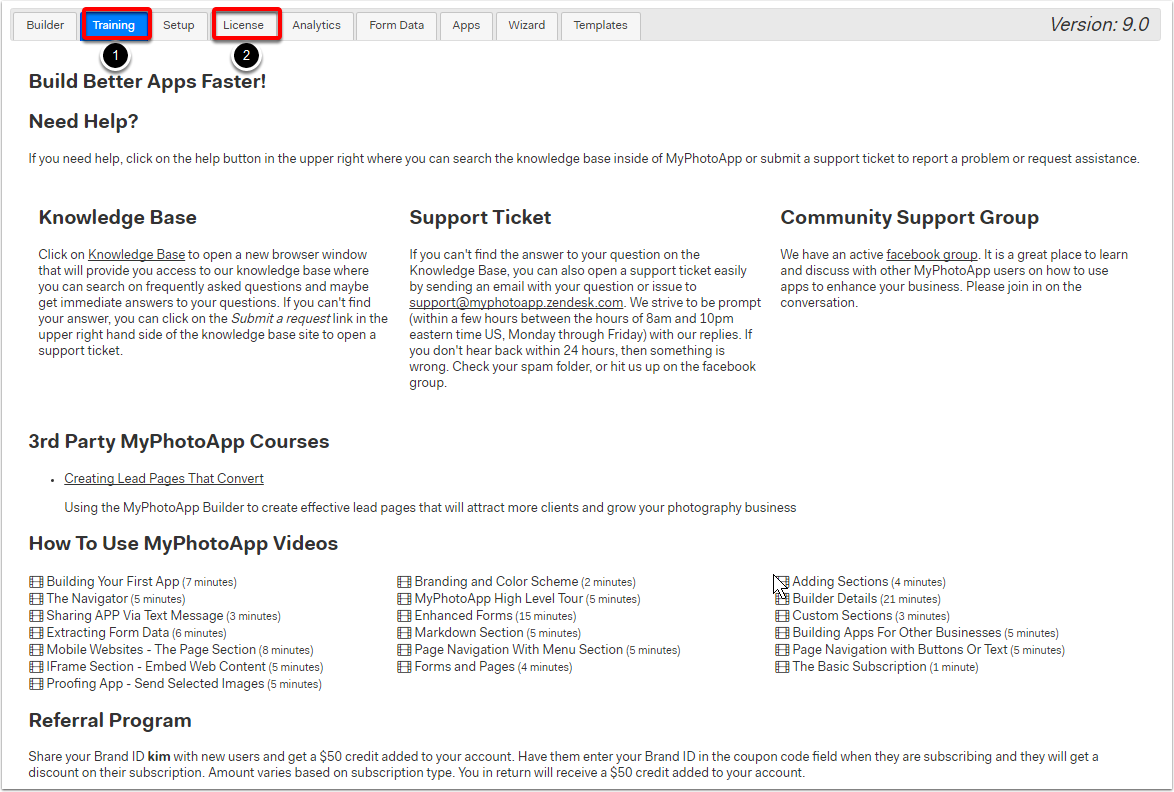
When you sign up for your MyPhotoApp free trial the first thing you'll see is the Trial Membership welcome message reminding you how many days you have left, You can sign up for a MyPhotoApp subscription at any time by clicking on the License Tab (1).

To get started just click the cross in the top right corner to close the welcome message and the first screen you'll see is the Wizard this guides you through building a simple photo App in 6 easy steps. The first thing you need to do is enter a Name for your App, which should consist of letters, numbers and underscores only with NO spaces. App names are also case sensitive. You’ll be prompted to set up some basic information such as your email address and phone number and given the opportunity to upload your logo file and choose your color scheme. Don’t worry if you haven’t got this information to hand you can just type in your business name in the text option for now. We'll be covering Brand Setup in the next How To Guide.
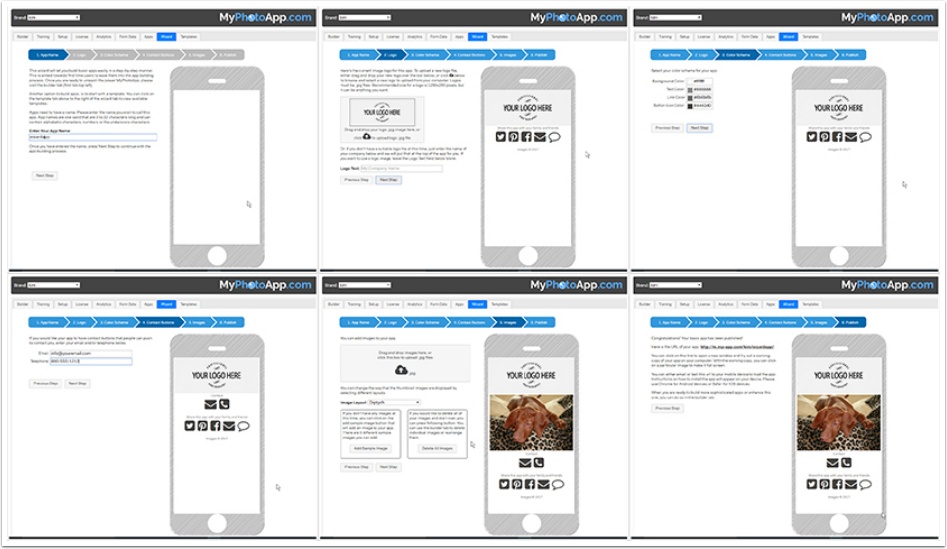
The last step in the Wizard is to publish your App, once you have done this you will see the publish status window with all the details you need to share the App.
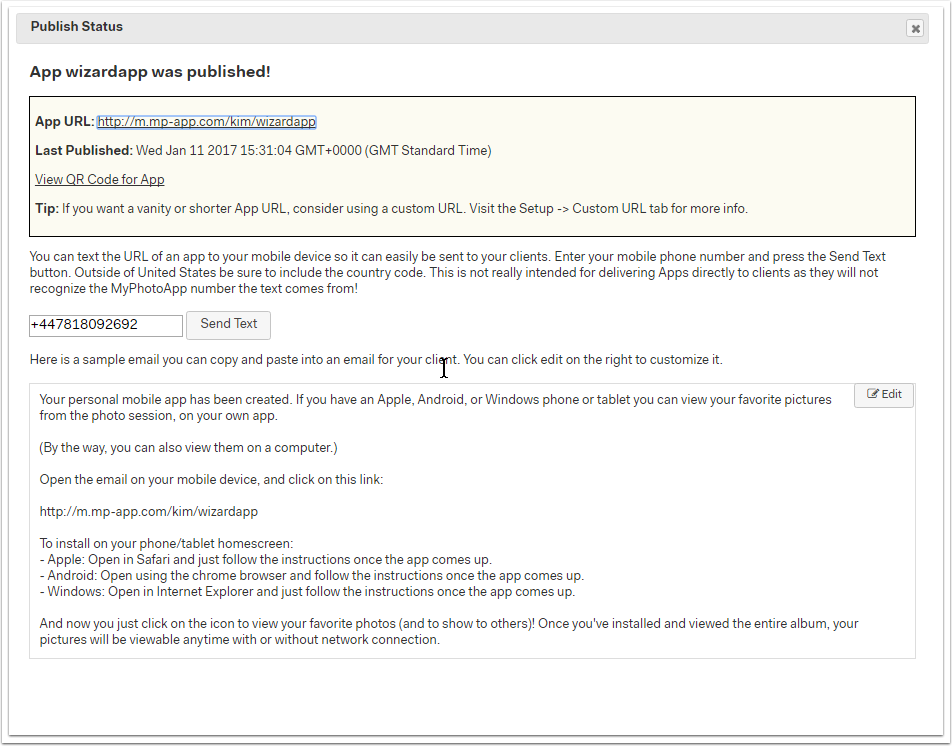
Click on the App URL to view it in your browser or enter your mobile number and click on send text to view it on your mobile.
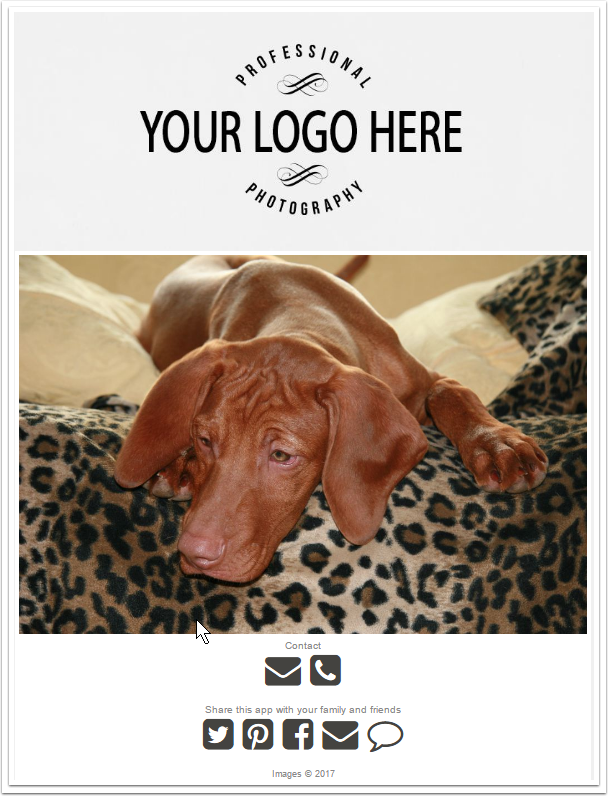
If you haven't verified your email address yet you will get a message reminding you that you'll need to do this before you can publish your App so head on over to your email and verify it. When you log back in you will be taken to the Builder screen where you will see your first App selected click on publish on the right to finish the process and click the App URL to check out your first creation.
Tip: You can choose to use the wizard at any time by clicking the Wizard Tab. If you haven’t already done so take a minute to work through the wizard and build your first App.
The Builder Tab - Where All The Action Happens
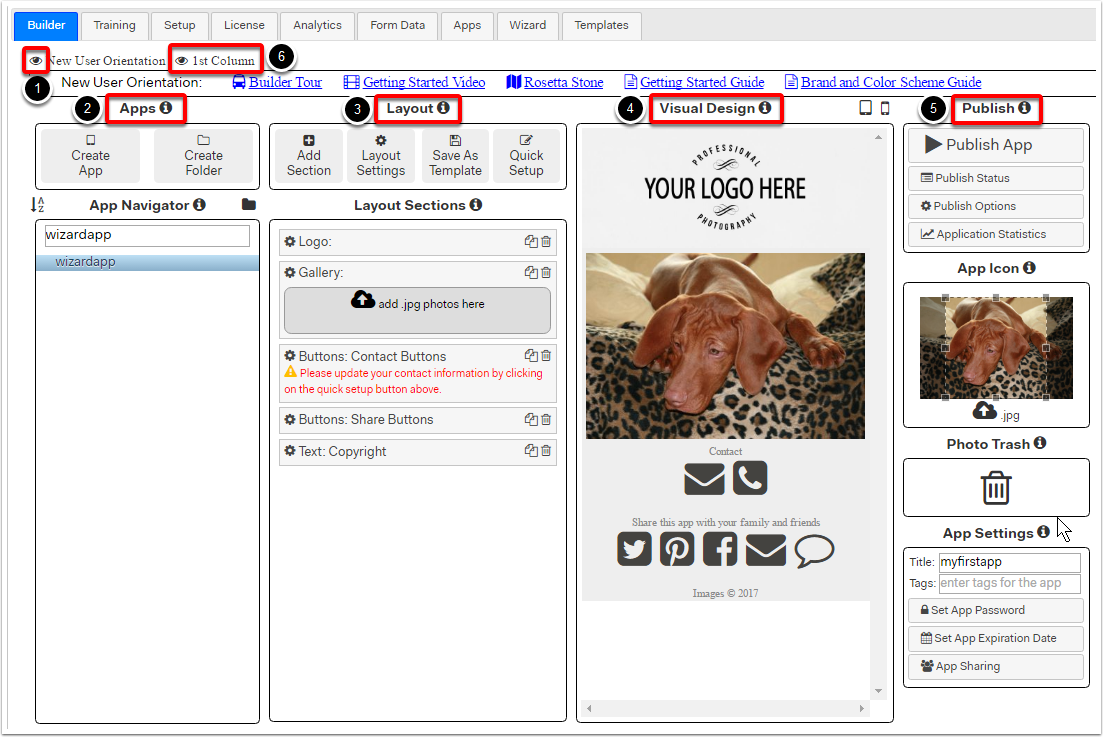
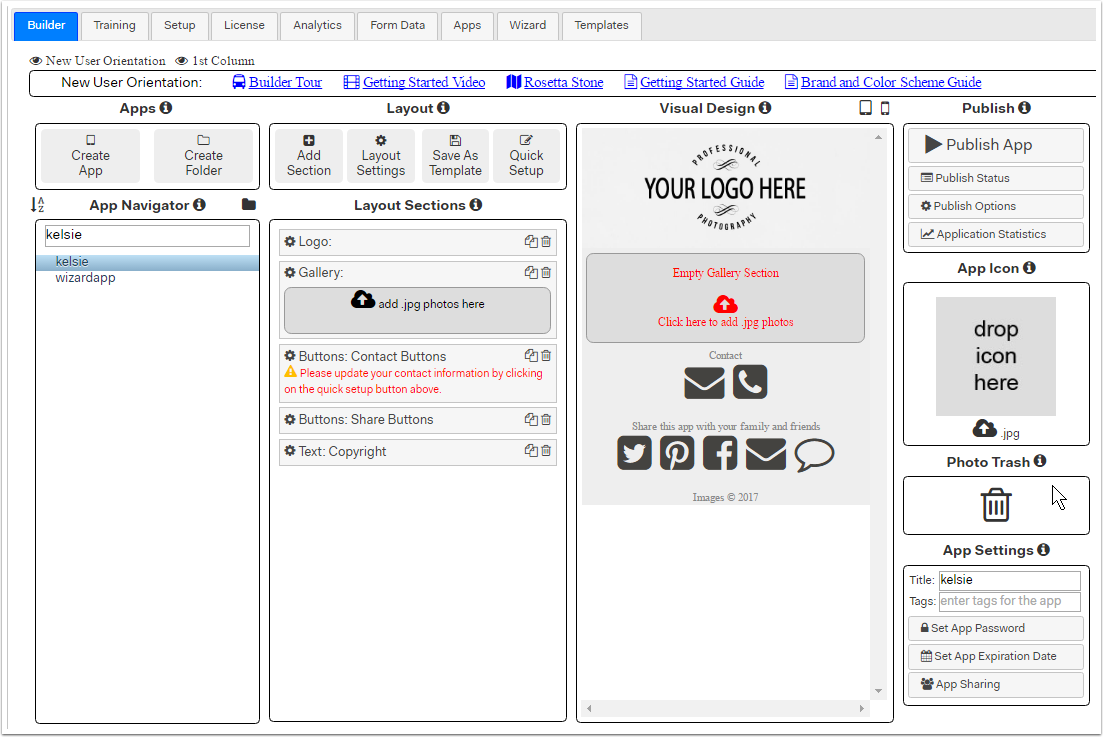
OK so let's close the browser Tab displaying your first App and return to MyPhotoApp so we can take a closer look at the Builder Tab. If you haven't already done so just close the publish status window by clicking the cross. This is where it all happens, everything you need to build Apps It can look a little intimidating on first sight but don't worry you'll soon find your way around. The Builder is made up of 4 main areas laid out in columns, from left to right these are; Apps; Layout; Visual Design and Publish. You'll notice that there is an ' i ' icon to the right of each heading, click this for a detailed description and help on each section. Above the column headings, you'll also see the New User Orientation links displayed. You can click the Tour Bus link to take a quick tour of all the key features and tools.
- New User Orientation - this has handy links to all the getting started resources you need. When you no longer need to see these just click the eye symbol to hide it. You can click the eye again at any time to redisplay it.
- Apps - This section is where you create new Apps or Folders in which to organize your Apps. Apps and Folders are displayed in the App Navigator section. When you create a new App or Folder, they are placed at the top of the list for easy access. In the screenshot below, the new App I created with the wizard called wizard app is the only one in the list. Over time the list will grow as more Apps and Folders to organize them into are added. Clicking the A-Z will sort ALL Apps, folders and Apps in folders alphabetically. But be warned this cannot be undone!
- Layout - This section deals with the layout and the look and feel of your Apps and includes your branding information, color scheme, and contact details together with the sections that comprise the App. The sections already included in the App are displayed in the Layout Sections column. The App you created earlier with the Wizard comprises of the 5 sections included in the Default Template: Logo; Gallery; Contact Buttons; Share Buttons and Copyright.
- Visual Design - This is a preview of what your App will look like the 5 sections listed in the Layout Sections area are displayed in the default order with the information entered when you created your first App. If you didn’t enter your contact details there will be a red message, like the one in the example below, prompting you to update them.
- Publish- This final column has a number of different sections. The most important one being the top one - the Publish App button you click this when you have finished designing your App to create a working copy.Apps cannot be shared until they have been published and any changes you make will not be seen until Apps are republished. The other sections allow you to select the App Icon; Delete unwanted photos from the Gallery by dragging them directly from the Visual Design to the Trash and choose additional App Settings.
- 1st Column - Clicking the eye symbol toggles between hide and show for the first column Apps in the builder to make it easier to work on Apps on smaller screens.
The Training TAB - Home of Training & Help Resources
The Training tab (1) is where you'll find all the Training & Help resources. Click on the link to the Knowledge Base to find the latest How To Guides or use keywords to search Frequently Asked Questions for an immediate answer. If you still have a question or need more help just submit a Support Ticket, and we'll get back to you in no time. You'll find a range of Quick Start Videos designed to help you get the most out of MyPhotoApp. The first video is Building Your First App so if you haven't watched this yet now is a good time. You'll also find information about our Facebook group, version history and the features added and how you can earn free months or Cash rewards through our referral program.
When you log-in to MyPhotoApp during your trial you'll see a reminder that you are on a Trial Membership, you can sign up for a MyPhotoApp subscription at any time by clicking on the License Tab (2). OK to get started just click the cross to close the reminder.
Tip: We are constantly adding new How to Guides & Videos so remember to check back if you have a question or just want to discover more cool ideas you can try.
Building and Customizing Apps
There are 3 ways to build Apps in MyPhotoApp
- The wizard
- Using a shared Template
- The Create App button
Tip: It is also possible to create a duplicate of an existing App and customize it by right clicking the App and selecting duplicate App from the menu or by entering the name of any of your existing Apps in the shared Template option in the format brand.appname this option even allows you to use an App from a different brand, which can be very useful. But you don’t need to worry about this yet.
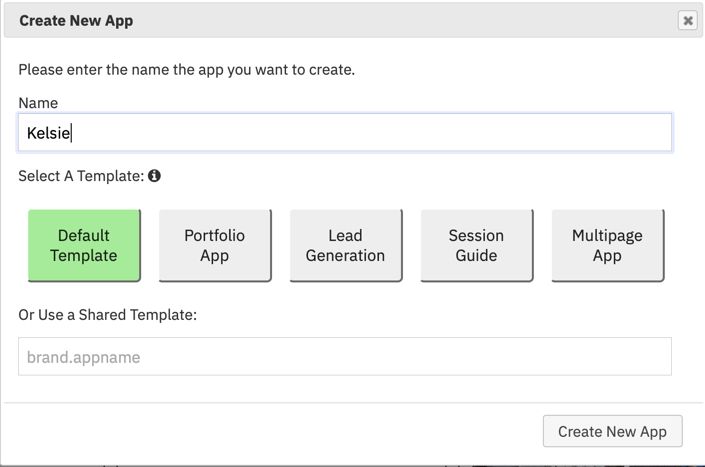
You have already built your first App using the Wizards so now we are going to build a Custom App using the Create App option and the default template. Click on the Create App button and enter a name for the new app, I've used the client 's name - Kelsie. You don't need to worry about selecting a template to use as the default template is automatically selected and we arent using a shared templates so just click the Create New App button.
Your new App will be at the top of the App Navigator and selected, it will have the logo or text logo you added in the wizard together with any contact details you entered so it should look something like this. We are now ready to begin customizing your new App.
The Stages of Building an App
There are 3 stages to building a working App:
- Create a new App using the default template or one of your choice.
- Build and customize App sections
- Publish & Share the App
OK, you have already created a new App and now its time to move on to stage 2 and build and customize it.
Let's start by adding some photos to the empty Gallery. There are 2 ways to do this
- Drag and Drop photos from an open folder on to the Gallery section in the Visual Design preview or
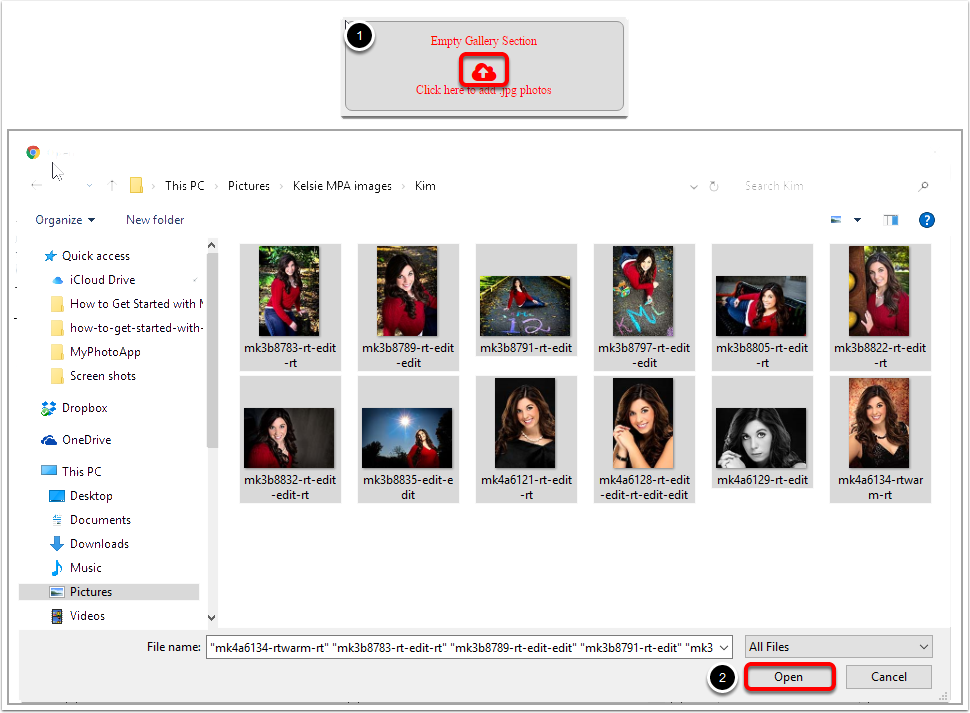
- Click on the Upload Icon to select a folder and photos
MyPhotoApp can only work with jpeg or png images. For this example let's click on the Upload Icon (1) and locate the folder with the images you want to use. Select the images you want to upload and click on Open (2) to start the process. For this example, I've selected 10 images of Kelsie from her studio session.
The File Upload Window will open with thumbnails and progress indicators (3) counting down as each upload is completed. If you want to add more images to the upload you can just drag them onto the file upload window. When all of the images have been uploaded, the window will close automatically. If you want to cancel the upload, just click the close and cancel upload in progress button.
Tip: You can use any size image you want, as MyPhotoApp will automatically resize them to 1024 pixels, but large file sizes will take longer to upload. For best results create jpegs at a suitable web size such as 1024 pixels on the long edge. Acceptable quality settings vary from image to image but 80%, quality 10 in Adobe PS, will give a good balance of quality v file size and speed. For optimum quality on larger devices upload images at 2048 pixels on the long edge and MyPhotoApp will maintain this image size.
Check Out The Gallery
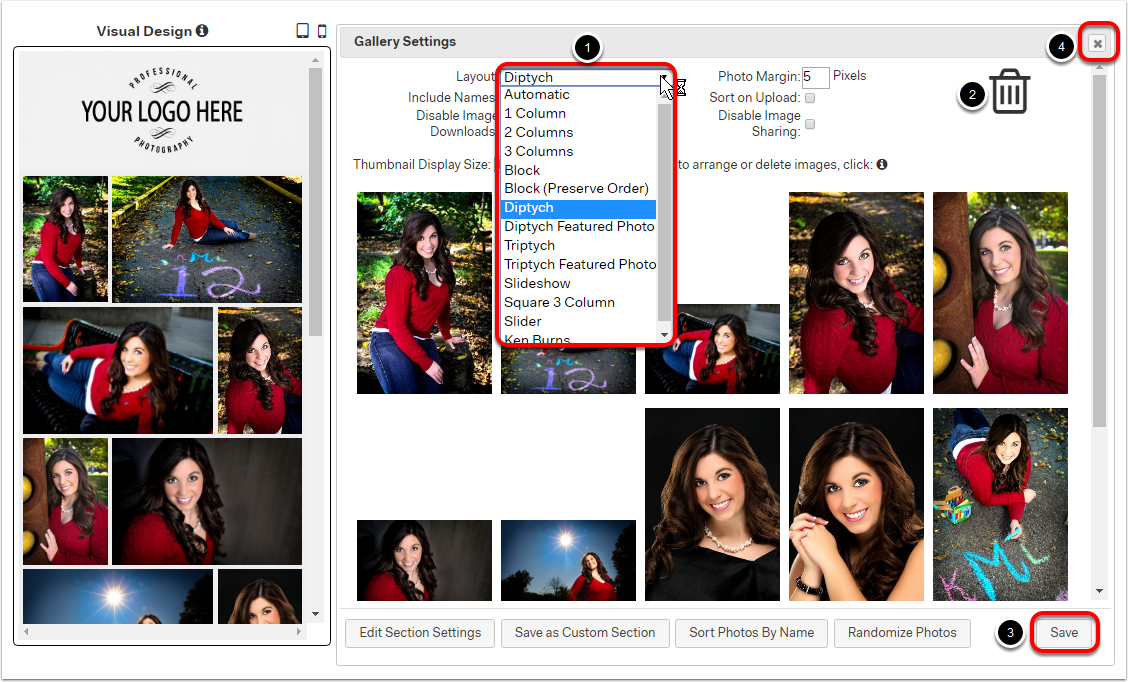
Once your images have finished uploading they'll be displayed in the Gallery in the Visual Design area. Hopefully, they look pretty cool like this. Click the Settings Cog on the left of the Gallery section in the Layout Sections area to open the Gallery Settings to choose a different layout and select various options. You can choose from 14 different Gallery layouts (1) by default the layout is set to Diptych. if you choose automatic the App will choose the best option for the device it is being displayed on. You can
You can drag and drop images into the order you prefer or delete any you have changed your mind about by simply dragging them to the Trash (2). To delete multiple images click each to select and then click Trash to delete them. Next choose the thumbnail size, medium or large looks good, and the other settings you want and when you have finished click Save (3) to close and apply the changes or the Cross (4) at the top right to cancel without applying any changes.
Choose A Photo For The App Icon
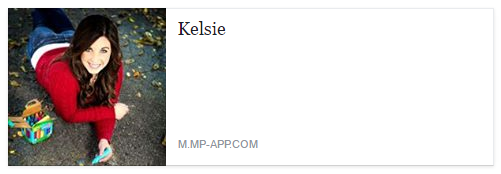
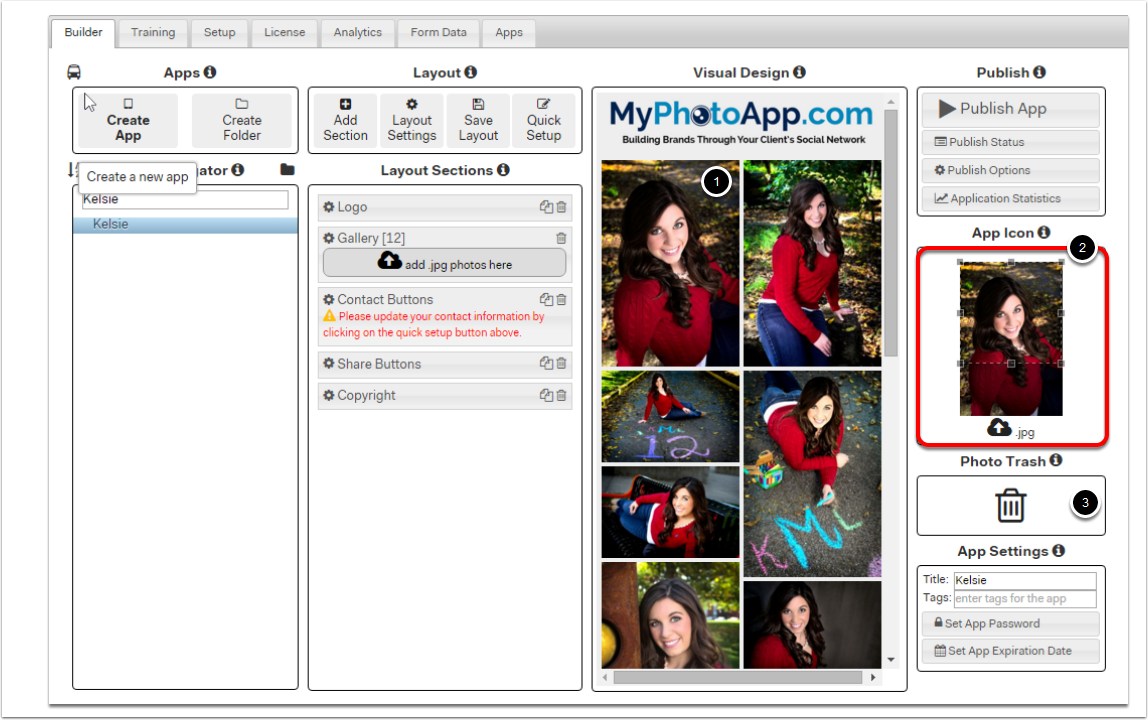
By default the first image (1) in the Gallery is selected as the App Icon (2), this is the image displayed on the Icon when it is downloaded onto a mobile device or added as a link in a Facebook post like this.
If you'd prefer to use a different image, just drag it over to the App Icon. You can then use the resizing handles to resize and position the selection box like the example below.
You can choose to have an image for the Icon that isn't included in the gallery by clicking the jpg upload button on the App icon and uploading a different file. You can also delete photos direct from the Gallery in the Visual Designer by dragging them to the Photo Trash (3) on the right-hand side.
Publish Your App
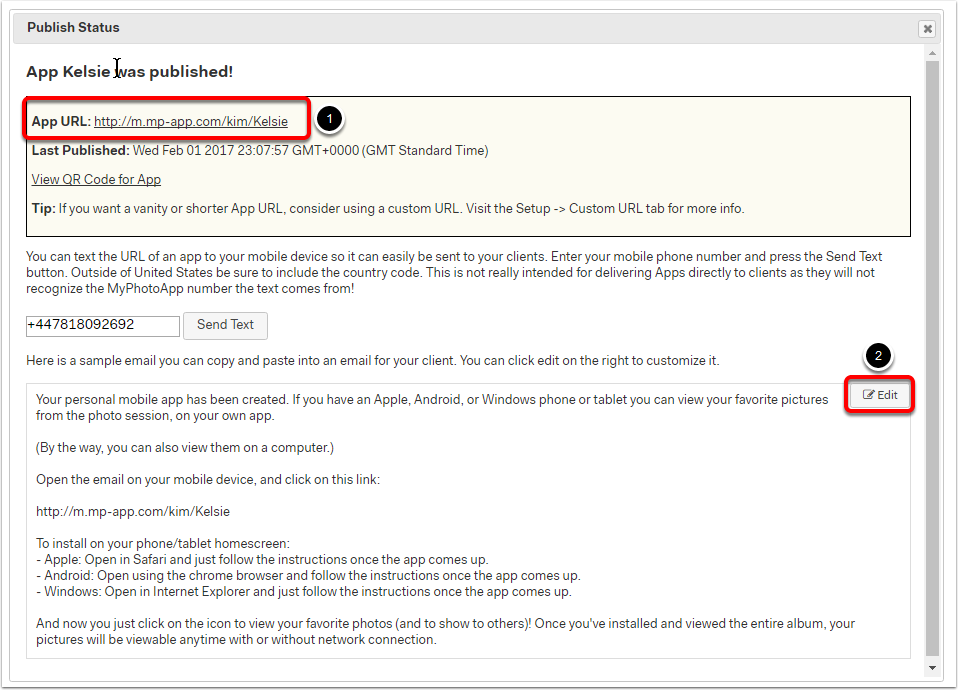
OK, that's looking pretty awesome - so it's time to take a look at what your App is really going to look like by clicking on the Publish App Button to create a working copy of it. The Publish Status window will open confirming that your App has been published. Well done! Now you're ready to check out your App by clicking on the App URL link (1) to open the App on your computer.
Tip: To find the App URL again just click on Publish Status on the right, When you have finished your App and Published any changes you are ready to share the App with your client, just select and copy the App URL into an email. You can also select and copy the sample email text or if you prefer you can customize it by clicking Edit (2). When you have finished, click Save to update the sample email text. You can undo the changes at any time by clicking Reset Email to Default on the Edit window.
Test Your New App
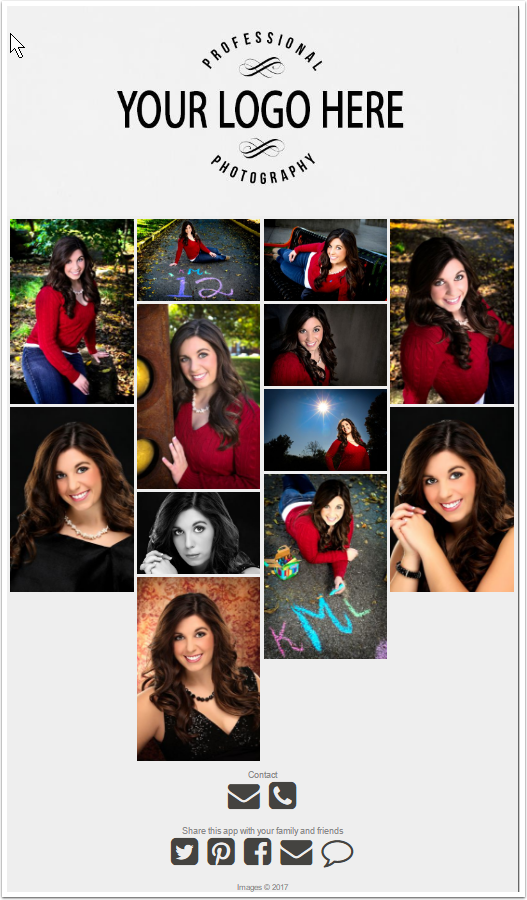
Your App will automatically launch in a new browser window and should look something like this. It looks like the Visual Design, but because MyPhotoApp automatically resizes it according to your screen, it will be much wider with more images across because you're currently viewing on a computer. Clever. The default maximum width when viewed on a computer is set at 1024px this can be increased for optimum viewing on large screen computers.
Viewing Images
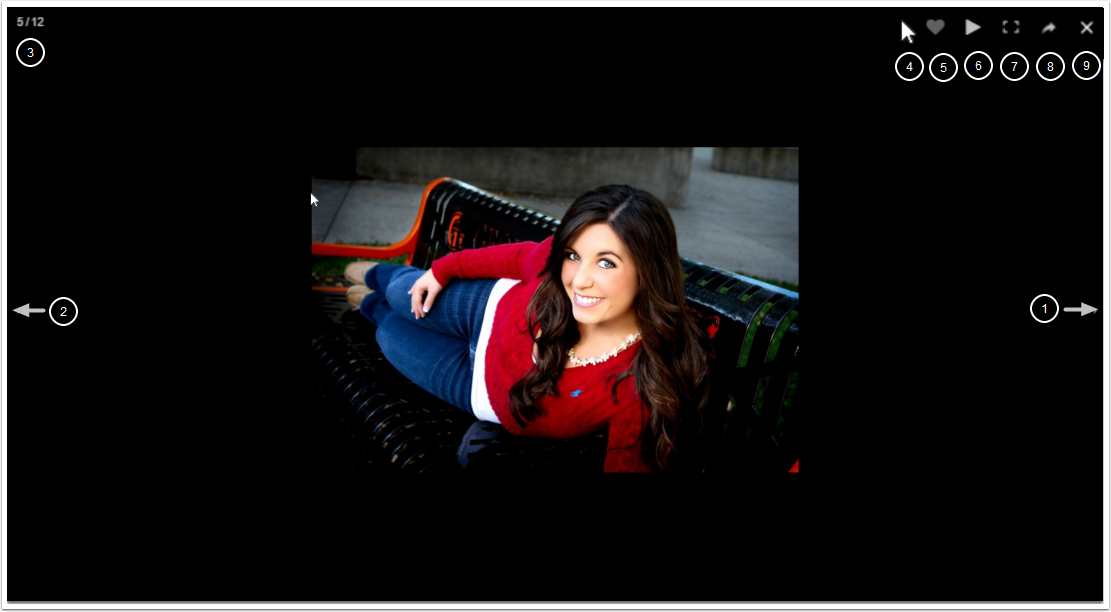
Take a few minutes to try out some of the cool features of your App, click on any image to switch to a full-screen preview of it. You can now scroll through your images using the Next (1) and Previous (2) arrows on the right and left-hand side. At the top left, you will see the number of images you are currently viewing and the total number of images there are in the Gallery (3). On the right hand of the screen is the Tool Bar consisting of Zoom In-Out (4); Like (5); Play Slideshow (6); Toggle Full Screen (7); Share (8) and Close (9).
Congratulations
That's it you have now successfully created and published your first App. Well done. In the next How To Guide I'll show you how to set up your brand and customize the other features in your App to make it truly awesome.