 |
Need a knowledge base like this for your business?
How To Add A PDF Document Using The PDF Section
 | By Kim Dixon, MyPhotoApp Training Guru Created: March 6, 2016, 6:36 pm UTC Last updated: February 15, 2019, 7:16 pm UTC |
In the latest update to the MPA builder, a new PDF Section has been added to the Professional Subscription Section. This allows you to add PDF Files to your Apps for viewing. This is useful if you have already created a PDF price guide or an e-brochure that you would like to use.
There are two ways of adding a PDF file using a PDF section:
- By linking to a PDF already hosted online or
- By uploading a PDF to your MyPhotoApp Resource list
Add A PDF Using The PDF Section:
- Click on the Add Section icon and choose PDF from the list of layout sections, you will find it under the Professional subscription section.
- Click on the Setting Cog in the layout sections to open the edit PDF Settings menu. (you won't see it in the layout design until you have added the PDF)
You can Add a PDF in two ways:
1. Link to a PDF already hosted somewhere online - such as your website
- Locate the PDF resource you wish to add to your App and highlight and copy the full URL including the http:// part. Paste the full URL for the PDF into the URL field.

NOTE: When linking to PDF files stored in Dropbox follow these steps:
- Locate the PDF file you want to link to in your Dropbox account
- Click Share and then Copy link
- Return to the Builder and Paste link into the URL field in the PDF settings
- Use the right arrow key on your keyboards to scroll to the end of the URL link where there should be the following text "pdf?dl=0"
https://www.dropbox.com/s/dwwh848aiuefh8j/10%20things%20you%20should%20know%20about%20light.pdf?dl=0
Simply replace the "0" with a "1" like this "pdf?dl=1"
The URL link should now look like this.
https://www.dropbox.com/s/dwwh848aiuefh8j/10%20things%20you%20should%20know%20about%20light.pdf?dl=1
- Enter a specific height for the PDF section in pixels, something between 300-600px usually works well or leave this field blank to apply the default setting which is 60% of the width of the app.
- Click Save - the online PDF resource will be located and the PDF should be displayed in the Visual Display area.
2. Upload a PDF file as a Resource
- From the PDF Settings menu Click on the Edit Section Settings button in the lower left and then click on the Resources Icon.
- Drag or browse to select the PDF file you wish to upload.
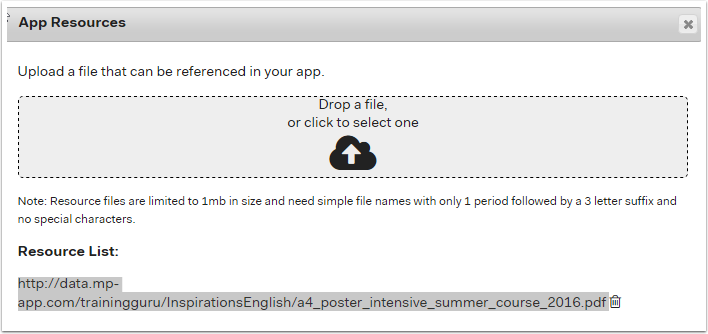
- Once complete copy the Full URL generated in the resource list for the uploaded PDF file.
- Click Return and Paste the URL into the URL field.
- Click Save - the PDF will be displayed in the Visual Display area.
NOTE: Resource files must not be larger than 5mb in size and need simple file names consisting of letters and number without any spaces and no special characters followed by 1 period and the 3 letter file suffix e.g. priceguide2016.pdf
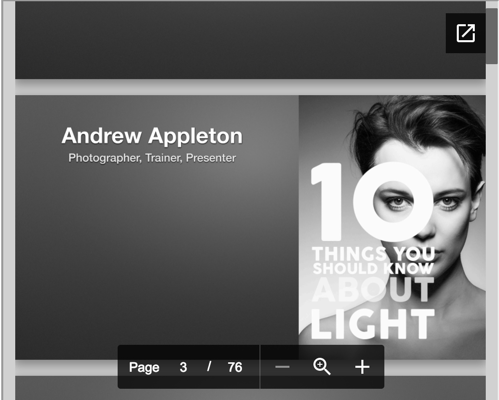
Once the PDF file is displayed in the Visual Display area you can view it in one of two ways:-
- As a pop-out - Click the pop-out symbol in the top right- hand corner to open a new browser window and display the PDF file.
- By Zooming in - Click the magnifying glass on the navigation menu at the bottom of the page to zoom in to the max width for current display option in the visual display area, click again to return to the default magnification. click the + symbol to the right of the magnifying glass to zoom in more and the - symbol to zoom out. Click the magnifying glass to Zoom out to the default magnification again. Use the scroll bars or the up and down arrow keys or page down or page up keys on your keyboard to navigate the document. The page number you are viewing will show on the navigation menu along with the total number of pages the PDF contains.
When you have finished adding content Publish the App to test it.