 |
Need a knowledge base like this for your business?
Shopping Cart Section
 | By Kim Dixon, MyPhotoApp Training Guru Created: November 13, 2016, 4:54 pm UTC Last updated: April 4, 2017, 4:53 pm UTC |
Overview
Adding a shopping cart section to an App displays the shopping cart icon when viewing a Gallery in full-screen preview mode. The shopping cart allows you to add the ability for your clients to order and now pay via PayPal for specific items you set-up for the individual images or product images displayed in a gallery.
This feature is an "order taker" only, and you will still need to fulfill the order for your clients once you receive it.
This is a great solution for businesses that want to provide a proofing app to clients and to then be able to receive orders from that app.
The feature can also be used to accept payments for any type of product or service you choose to display in the gallery such as
- booking or reservations fees
- session fees
- deposits for services
- products for sale
To add the shopping cart to your gallery simply add a shopping cart section to the App. Once you have added the shopping cart section, every gallery in your app will display a shopping cart icon on the gallery toolbar which people can use to add images to their shopping cart.

Here is an example of the gallery with the shopping cart in it.

To operate the shopping cart clients simply press on the shopping cart icon while viewing the image or item they wish to add to their order. This displays the cart options screen below. It shows a preview of the image selected and a product list with up and down arrows to select the option they wish to purchase from the choices available.
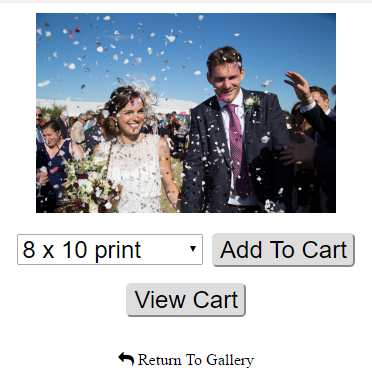
The example below shows a simple print order option where the client can select the size they wish to order using the up and down arrows to select the option they want from the print sizes listed.
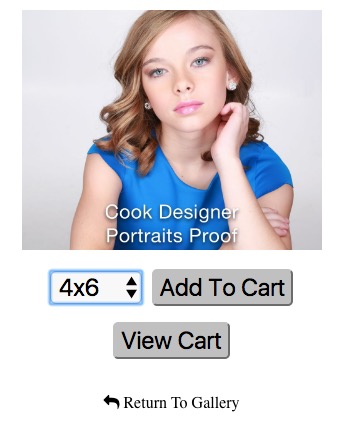
Once the purchase option has been selected pressing add to cart will take them to the shopping cart window where they can see their order and submit it to the studio or press Return to Gallery to add more items.
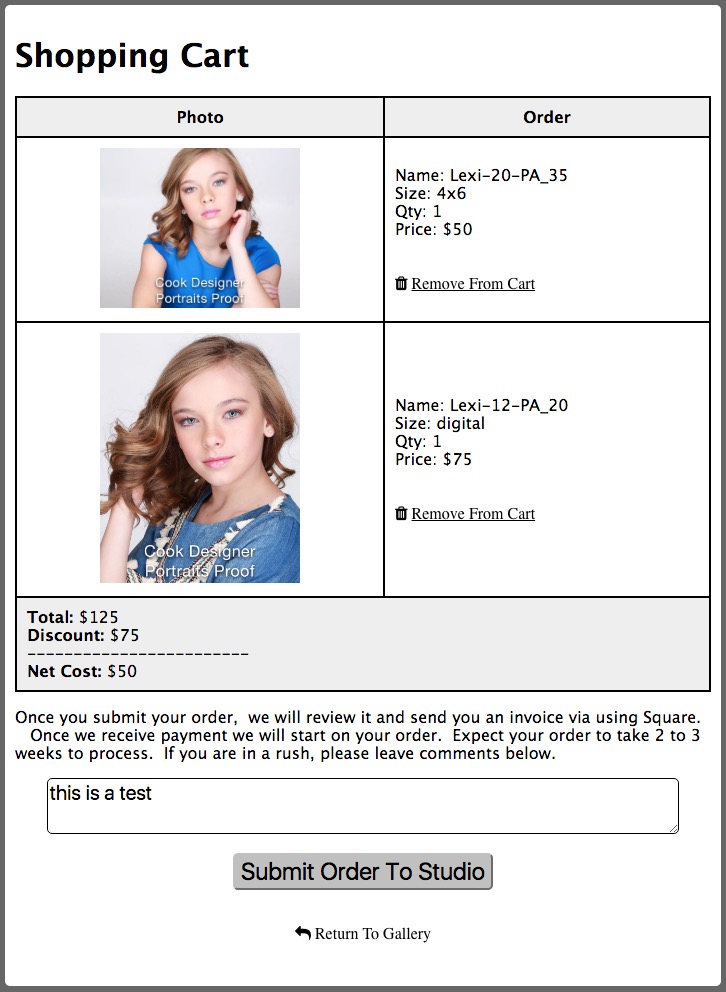
When an order is submitted, an email is sent to you. The email will look similar to the shopping cart above. Unlike forms, the cart order is NOT stored in the forms Data Base of MyPhotoApp. The email is the ONLY confirmation you will receive so make sure you save it for your records.
How To Setup The Shopping Cart Section
Only one shopping cart per app is required. Once you have added a cart section to your app you will need to configure the shopping cart by clicking on the settings cog next to the shopping cart section in the layouts section area of the builder to open the Edit Shopping Cart settings menu:
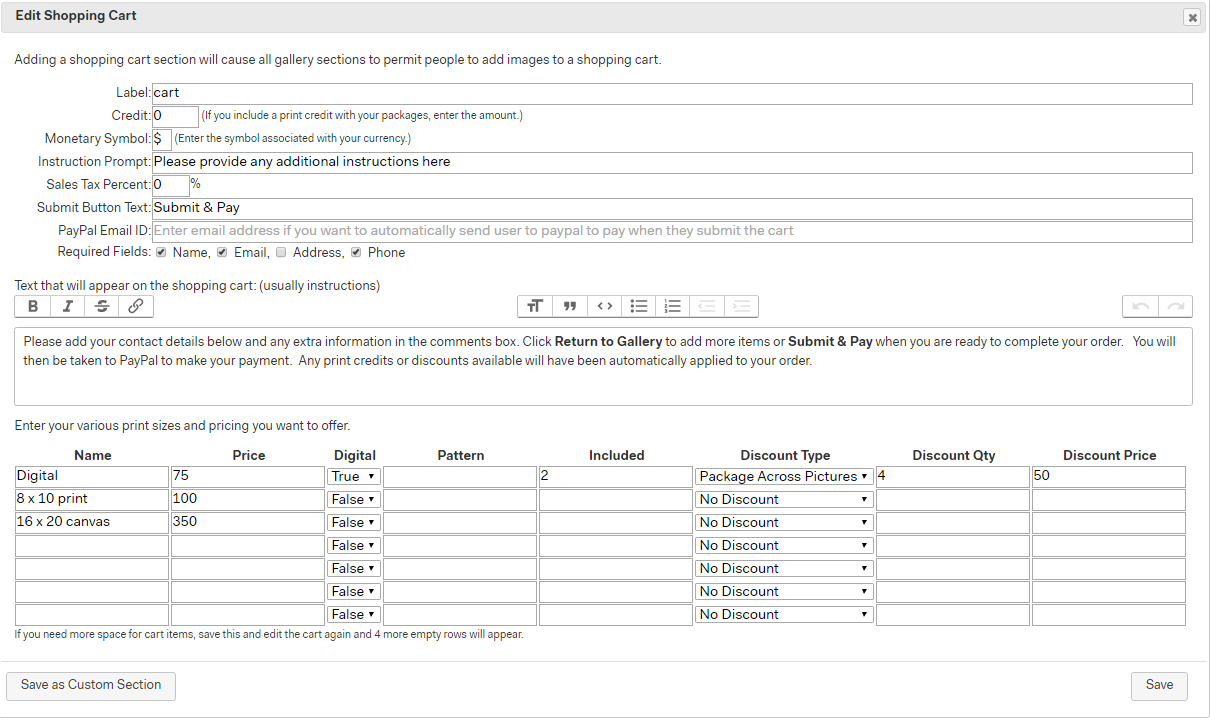
here is a breakdown of the fields and how to complete them:
Label: This is the label for this section that appears in the layout sections column.
Credit: If you sell a session fee or product package which provides people with a credit towards prints, you can put the credit amount in this field, and it will be subtracted from the total of the order they place.
Monetary Symbol: Defaults to US Dollars, but you can change to whatever you want. (e.g. £ for pounds)
Instruction Prompt: At the bottom of the shopping cart is an input text area where clients can add any special instructions or requests for your information. Click here to change the prompt for this field if you want.
Sales Tax Percent: If you charge sales tax, enter the percent, and the cart will automatically calculate the sales tax for the order. If you do not charge sales tax simply leave this field blank.
Submit Button Text: When people are ready to submit the cart to you, they will click a button. This is the text that will display on the button. You can change it, for example, to Submit & Pay if you intend to link the shopping cart to a PayPal account.
PayPal Email: Once the order has been sent to you, it is now possible to automatically send the user to PayPal to collect your payment. If you want this to happen, enter your PayPal account email address (the email you login to PayPal with). When they submit their order, they will then be sent to PayPal to pay the total amount that was displayed in the shopping cart.
Required Fields: The cart has 4 optional text fields that people can fill in. If you want to require any of these fields, just click the checkbox.
Order instructions: You can provide order instructions and policies that will be shown in the shopping cart. For example, if you are including the option to pay via PayPal you can say that clicking submit & pay will take them directly to PayPal to complete their purchase.
The table is where you provide the item options that will be available for clients to purchase:
Name: The name of the item that will appear in the shopping cart and on the order.
Price: The unit price for the item.
Digital: true/false - specifies if this is a digital product - if set to true, this means that a person cannot order more than one for each image in the gallery.
Pattern: Normally the items you add to the shopping cart are applicable for all images in the shopping cart. If you want to restrict a shopping cart item to only certain images, this can be achieved by naming the files in the gallery using a prefix pattern. You can then simply enter the relevant prefix you wish to limit an item to in the pattern field. The value you enter in the pattern field must equal the beginning of the file name for the shopping cart to match it. If the pattern you have entered matches the image selected, the item will be displayed in the drop down item list. If not it will not appear. If no images in the gallery match the prefix, the item will not appear at all.
This system allows you to add items that only apply to either an individual image or a group of images. It is a form of classification and allows you to add different items and pricing for different files in the galleries. The more complex the pricing structure you want, the more important how you name the files becomes and the more organized your pattern naming system will need to be. Remember if nothing is entered in the pattern field the item will be displayed in the shopping cart selection list for EVERY image in each gallery in the app.
Here are some examples of how you could create prefixes for a variety of different items you might want to include in a gallery.
| Item | Pattern Prefix | File Name |
| Booking Reservation Fee | BF | BF-booking.jpg |
| Session Fee + Print Credit | SF | SF-session.jpg |
| Digital | Grant | Grant-1026.jpg |
| 8 x 10 Print | Grant | Grant-1026.jpg |
| 16 x 20 canvas | Grant | Grant-102.jpg |
| spirit of the wild 16 x 20 limitted edition | SW | SW-2560.jpg |
| wooden house sign | WHS | WHS-3401.jpg |
| Dogs are best sign | DAB | DAB -3406.jpg |
You can choose to separate the prefix used in the file name with a hyphen or not; the prefix is not case sensitive when entered in the shopping cart field.
With this system, it is possible to have individually priced items in a gallery by assigning a unique prefix to each items file name and creating a corresponding item with that prefix in the shopping cart. It is also possible to have a series of items that is only displayed for an individual file or group of files.
If you are planning a complex prefix structure, it may be helpful to create a table to organize files and assign prefixes for your records, so it is easier to stay organized and add your shopping cart items
There are now many different possibilities to explore.
Included: If you include some prints in your package of specific sizes, then you would specify how many of this print size is included and thus will not be charged for here.
Discount Type: If people purchase in volume, you can provide them with a discount by choosing Package Across Pictures. This is a package discount that is applied across all items in the shopping cart. In the example above, if a person purchases 4 digital images, the price for the 4 digital images will drop to $50 each. This applies for each multiple of 4 images they purchase, 4, 8, 12, 16 and so on but any additional images less than a multiple of 4 will be charged at full price.
So for the example settings shown in the shopping cart table above this table shows the discount applied when a client purchases different quantities of digital images:
| Digitals | Cost | Reason |
| 1 | 0 | 2 are included for free |
| 2 | 0 | 2 are included for free |
| 3 | 75 | 2 free + 1 purchased at full price |
| 4 | 150 | 2 free + 2 purchased at full price |
| 5 | 225 | 2 free + 3 purchased at full price |
| 6 | 200 | 2 free + 4 purchased -- package met, so $50 each for 4 |
| 7 | 275 | 2 free + 5 purchased images, 1 package of 4 at $50 each + 1 extra at normal price |
| 8 | 350 | 2 free + 6 purchased images, 1 package of 4 at $50 each + 2 extra at normal price |
| 10 | 400 | 2 free + 8 purchased images, 2 packages of 4 at $50 each |
Discount Qty: Specify how many they need to purchase for the discount to apply.
Discount Price: The discount unit price when the discount quantity is purchased.
How to Use The Shopping Cart
Once you have set up your shopping cart it's a good idea to publish your app and test it out to make sure it looks and works as you intend.
Click on any image in a Gallery to open the full-screen preview, and the shopping cart icon will appear on the toolbar in the top right-hand corner.

Click the shopping cart icon to open the shopping cart selection window, this displays a preview of the selected image or product, below this is items list, use the up and down arrows to selected from available items and then click add to cart. To check what is already in the shopping cart click view cart or if you have changed your mind click the return to gallery arrow to close this window
When you click Add to cart the shopping cart window will be displayed, and looks like this, It lists everything that has already been added together with the price of the items. You can increase the quantity of an item by clicking the + symbol to the right of the quantity. Click the - symbol to reduce the quantity or if you change your mind remove from cart to delete an item from the order. Any discounts or taxes applied to the order so far will be shown with the total value of the order. To continue adding more items lick the Return To Gallery arrow to exit the shopping cart.
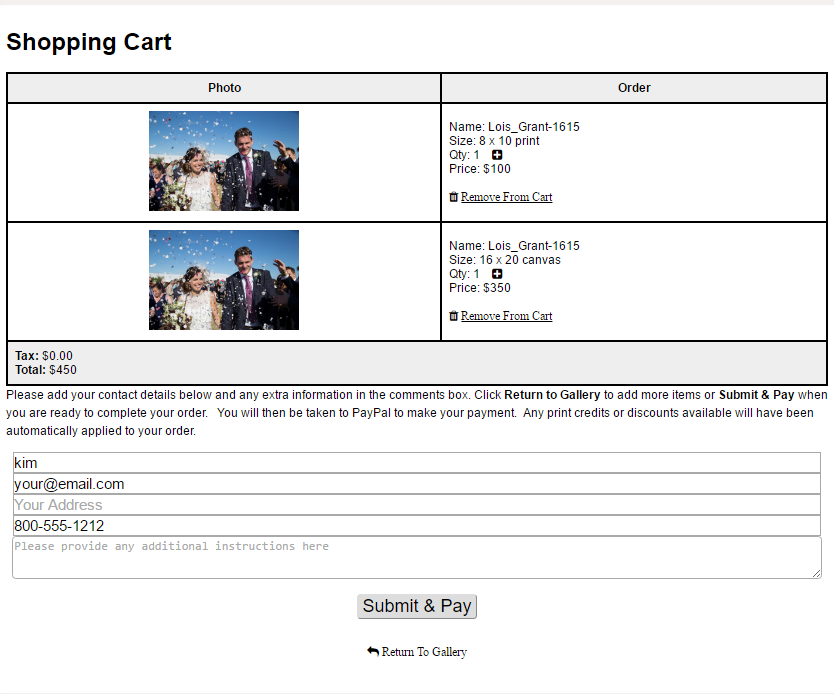
Before the order can be submitted the client will need to fill in all the required fields in the form below the order summary. It is a good idea to tick which fields are essential for your order process when you set up the shopping cart. If the client clicks to submit the order and a required field hasn't been completed they will get an error message.
Once all the required fields have been filled in clicking the submit button will send an email with a copy of the shopping cart to you ready for you to fulfill the order. If you haven't linked the shopping cart to a PayPal account, the client will be returned to the app after the order email has been transmitted. If you have linked a PayPal account, they will be sent to PayPal to complete the payment, and the total from the shopping cart will automatically be filled in.
All you need to do now is acknowledge receipt of their order, invoice them for payment if you haven't connected a PayPal account, and fulfill the order.
In version 8.5, you can now specify the prompt that people see in the comment box at the bottom of the shopping cart.
From 9.1, you can now specify a prefix for items in the gallery to allow separate pricing.