Need a knowledge base like this for your business?
Fixed Background Image
By Kim Dixon, MyPhotoApp Training Guru
Created: November 28, 2017, 11:41 pm UTC Last updated: February 19, 2019, 12:08 pm UTC
The Fixed Background Image section provides a simple way to add an image, with or without Title text, that remains still so it is scrolled over as a person scrolls down the app when viewed on a computer. Think of it as a cross between the parallax section and an image section. You are in effect creating a window between the sections above and below it in the App that will reveal the image as you scroll past it according to the size of the window.
The FBI does NOT scroll on mobile devices and you will see the image as displayed in the visual designer.
Use a Fixed Background Image Section instead of a Parallax section when you just want a fixed background to the text that you scroll over and not for them to act independently.
How To Set Up A Fixed Background Image Section
Add a new FBI section to your app and click on the settings cog to begin setting it up in a few easy steps:
1. Click on the ImageSettings menu
Image File - Click to upload or drag & drop the image you want to use as your Fixed background. It's a good idea to choose an aspect ratio and orientation that will look good as a background image, a portrait image will provide more of a scroll affect than a landscape one.
Opacity -100 equals full opacity move the slider to the left to reduce the opacity of the image and create a fade-out image.
Brightness - 100 equals normal, as uploaded, slide to the left to reduce and to the right to increase the brightness of the image.
Height - Specifies the size of the FBI Section from 0-100 and determines how much of the image will be visible at any given time within the app. The default height is set at 5 I have increased mine to 20 in the example above and this has the effect of creating a 20 sized window through which the image will be seen. setting a height of 50 will display the full image, over 50 will zoom into the image. When you scroll up or down the App on a computer the content of the sections above and below the FBI section will appear to be separated by a window that reveals the image as you scroll over it.
If set to 0% the height of the section will be restricted to the size of any text you have added like this:
NOTE: If no text has been added and the height is set to 0% then nothing will be visible!
The image you use will determine the best setting. If it is important to see all of the image on a mobile device set the image height to 100% on a computerthis will create a blind transition effect with the section content that is above and below the FBI section in the App. As you scroll down the app the image will be revealed from the bottom up as if the content of the section above it being raised in the manner of a blind. As you continue to scroll down the app the image will be then be covered by the content of the section immediately below it from the bottom up as if a blind is being pulled up over it.
Grayscale - Allows you to reduce the saturation of the image, 0 equals full-color saturation slide to the right to increase the level of desaturation and reduce color, 100% will totally desaturate the image and turn it into a greyscale image. You can see the effect in the preview area.
Blur - Allows you to add a degree of blur to the image, the default is 0 as in no blur, just slide the slider to the right to increase the blur up to 100%.
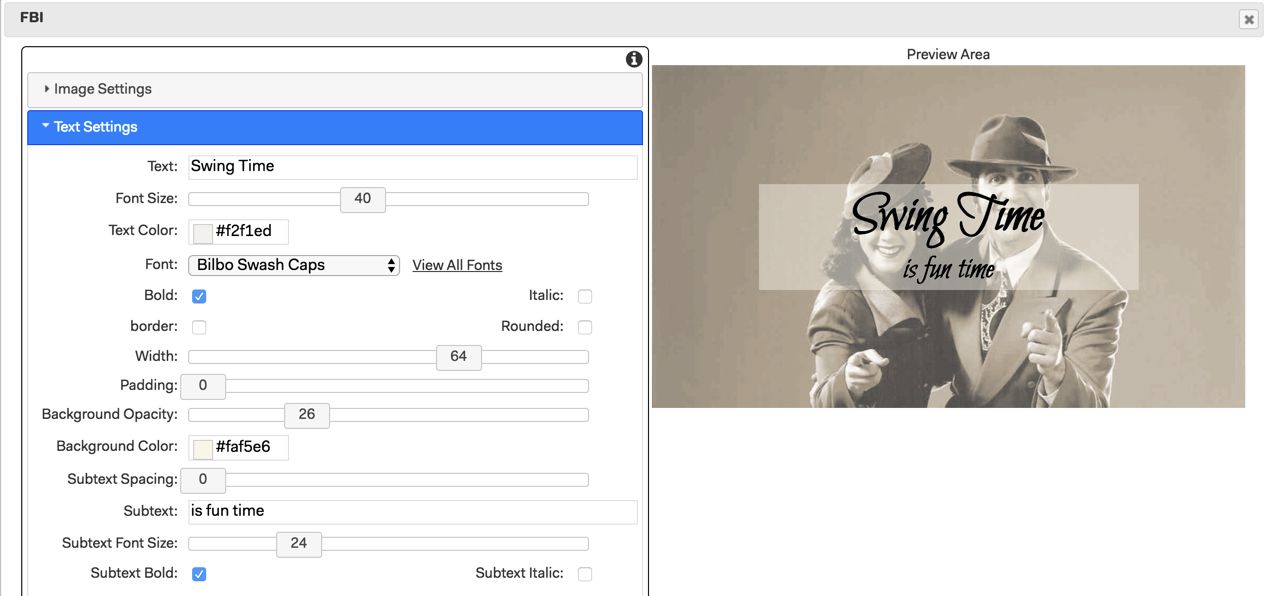
2. Click on the Text Settings menu
Text - add any title text you want to have shown over the Fixed background Image. If you don't want to add any text you can move on to the other settings menu.
Font Size - Adjust the font size.
Text Color - Type in the hexadecimal color number to match your brand color scheme or choose from the color picker. The color applies to both the Text and Subtext.
Font - Choose your font by scrolling down the list or by starting to type the font name. Your frequently used fonts will appear at the top of the list.
Bold and Italic - Tick the boxes to choose these settings for the Text.
Border - Tick to add a line border around the Text and Subtext.
Rounded - changes the standard rectangular border to one with rounded corners
Width - Choose the width of the border around the Text and any background color fill set.
Padding - Sets the height of the border around the Text. Leave at zero for the minimum border or adjust the slider to increase the width of the border and any background color fill set.
Background Opacity: Changes the Opacity of the Background color. A value of 0 adds none, moving the slider to the left reduces the value and moving the slider to the right increases the value and adds the background color as a fill. A value of 100% will add a solid color fill behind the text.
Background Color: Adds a rectangular fill that appears behind the Text & Subtext according to the width and padding setting. If a border has been set it will show around the background color fill.
Subtext Spacing - Slide to adjust the distance between the Text and the Subtext.
Subtext - Type in any subtext you want.
Subtext Font Size - Sets the font size of the Subtext.
Bold and Italic - Tick the boxes to choose these settings for the Subtitle.
The text will scale based on the size of the device so you will get a consistent look for all devices that use the App.
3. Click on the Other Settings Menu
Label - Add a suitable label for the section so you can easily identify it in the layout sections.
Make changes to any of the other setting you want.
NOTE: You can ignore the background image option and associated settings in this menu because you are already using the image uploaded as a fixed background.
When you have finished click save to update the section and publish your app to test how it looks.