 |
Need a knowledge base like this for your business?
How to Mirror Your Screen
 | By Kim Dixon, MyPhotoApp Training Guru Created: February 11, 2018, 5:38 pm UTC Last updated: February 11, 2018, 6:04 pm UTC |
Sometimes being able to demonstrate a feature, setting, or new app on a larger screen to someone can be invaluable. It’s also a great way to utilize the new IPS module when conducting your IPS session.
The ability to mirror an iOS device to a Mac or PC display or a TV through Apple TV could mean the difference between success and failure.
Luckily, there are a couple of different ways to make this mirroring magic happen.
Let's look at how to mirror an iOS device to a Mac or PC using either:
- QuickTime or
- Reflector with Airplay
1. Mirroring With QuickTime
There are several pros of mirroring with QuickTime:
- It available for free so doesn't cost anything extra
- The responsiveness is almost instant and
- Setting it up couldn't be easier.
The only con is that it requires a wired connection between the computer and the iOS device.
Setting Up
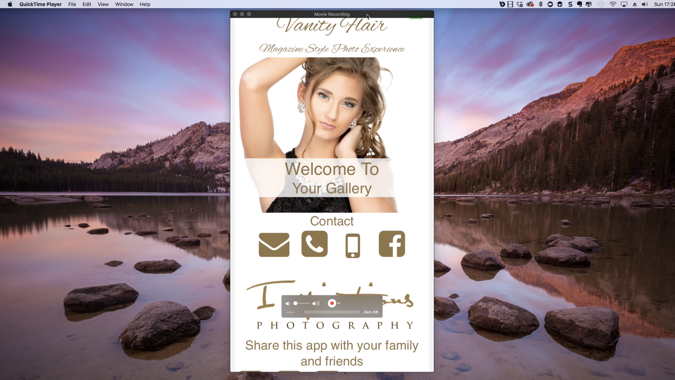
Launch QuickTime, this will bring up a file picker menu. You don’t want to play an existing file, so just click Done to close it.
Connect the iOS device to the computer via a Lightning-to-USB cable.
Note: When you connect your device iTunes and/or Image Capture on a Mac may automatically launch if prompted authorize the connection of the device by choosing trust this computer and then close them as you don’t want them to be syncing in the background.
Now click on the file from the top menu and choose new movie Recording.
Usually, the default input device will be set to the iSight camera on a Mac. To change it to the iOS device, click the down arrow next to the record button and select the iOS device from the camera list. If your device isn’t listed try unplugging it and reconnecting it.

The device's screen will instantly appear and any actions taken on the device will now be mirrored to the Mac or PC display.
An added advantage of this method is that the record button is just one click away. Using QuickTime's built-in recording feature makes creating iOS based screencasts easy. So now you can easily record a demo video on how to install an app on an iPhone for example.
2 Mirroring With Reflector 3
Reflector 3 is a handy inexpensive App from AirSquirrels that costs about $15 and is available for Mac and PC and allows you to use airplay to mirror your devices on your computer. You can download a free seven-day trial, to check out if you like this system more than the Quicktime option.
By far the biggest advantage of using Reflector is that it makes it possible to mirror your device without any wires. The mirroring works over Wi-Fi, much the same way that Mac or iDevices mirror to AppleTV. If you are PC based you can also buy the Air Parrot II app to easily mirror a PC screen to your TV using Apple TV.
To get started both the computer and iOS device must be connected to the same Wi-Fi network. The wireless connection could mean a bit of time lag depending on the strength of your Wi-Fi signal.
To download your free trial:
- Open the web browser and go to http://www.airsquirrels.com/reflector/download
- Click Try Reflector, then Download Reflector.
- For a Mac Download the .dmg file and open it and drag Reflector to the Applications folder.
- For PC download the .exe file and double-click it to launch set up to install the software.
- Once installed Launch Reflector and click Try Reflector to start your 7-day trial.
You won't see any windows or other application screens appear. Reflector 3 will live in the dock until an iOS device is connected to it.
On the iOS device, swipe up from the bottom bezel to open the Control Center and then click AirPlay.
Choose the Mac to which you wish to mirror from the list, and then enable Mirroring by entering the passcode that reflector displays on your desktop. If reflector doesn’t launch automatically just click it in the dock.
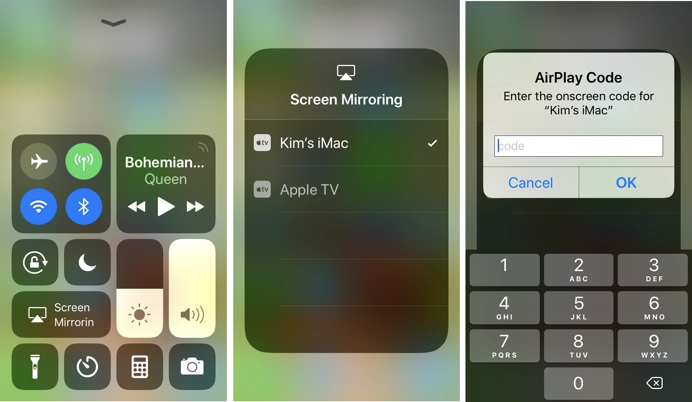
Once you have entered the passcode your device should appear on your computer and everything you do on it will be mirrored.

Mirroring an iOS device to a Mac using Reflector
Now you are all set to go and can demonstrate or use any of the features of your app and device on the big screen.
One of the nice little extras you get with Reflector is that you can choose from a no frame option or add a device frame in the color option you want.
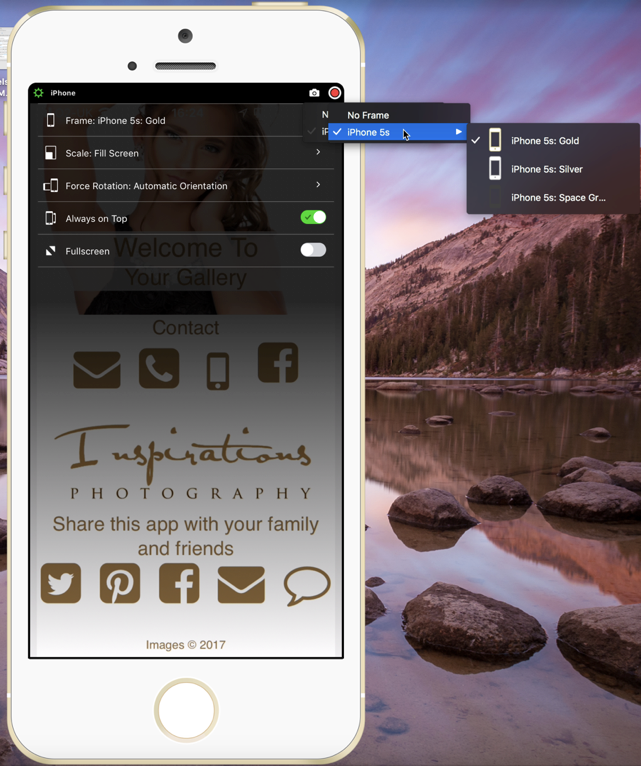
To choose your settings just move your mouse to the top to show the menu bar and click the settings cog on the left. You can take a screenshot by clicking the camera icon or press the red record button to begin recording your actions on the connected device. Click again to stop recording and save the recording.
When you have finished just click the ‘X’ next to the connected device name on the menu to end the mirror session and disconnect the device.
3. Use AirPlay to Mirror or extend your Mac display on an HDTV
If you have Apple TV, you can use AirPlay to wirelessly stream video to your HDTV from Safari or QuickTime Player, or use your HDTV as a Mac display.
When your Mac display and Apple TV are awake, choose your TV from the AirPlay status menu ![]() in the menu bar. You can then use the same menu to:
in the menu bar. You can then use the same menu to:
- Mirror your Mac display or use your TV as a separate display that extends the desktop of your Mac display.
- Turn off (disconnect) AirPlay from the airplay menu. Pressing the Menu button on the Apple TV remote also turns off AirPlay.
NOTE: If you Work on a windows computer you can achieve the same result using the Airsquirrels Airparrot 2 App